Thursday, October 4, 2012

Leave Those Pruners Alone


As fall sets in, and our plants start to look tired, we gardeners go into clean-up mode.  First, we clean out our vegetable gardens, putting plants with diseases and insects into the trash or burn pile and clean plants into the compost bin.  Then, we may start to rake up a bit.  The combination of cooler weather and sunshine just invites us to spend the rest of the day outside and so we start to look around for other tasks.  Often we go get the pruners and do a little trimming.  But is fall the best time to do that?  I argue that it is not.  In the fall your plants are about to go into dormancy, and pruning them can stimulate a flush of new growth at the wrong time.  This depletes the plants’ reserves of energy for the spring flush, and leaves open wounds at a time when frost is quickly approaching. 

Additionally, many people give their crape myrtles a severe pruning in the fall after this summer’s blooms have faded.  They usually do this for one of two reasons, either to ensure lots of blooms for next summer or to tame a tree that has outgrown its space.  While it is true that crape myrtles bloom on new growth, you do not have to prune in order to get blooms the next year.  The plant will put on new growth all by itself in the spring, and flowers will initiate from that growth.  If you have a crape that has grown to the point where its limbs whack you in the face when you mow around it or walk next to it, prune judiciously.  Try just taking off the offending limbs on the underside of the canopy and allowing the tree to grow up and over that sidewalk.  Still, this type of pruning should wait. Crape myrtles have a beautiful growth habit or shape when left to look natural.  Even the dried seed pods left on them in the winter add some ornamentation to a bleak landscape. 
 
Seed pods on crape myrtle

So, when should we prune?  I recommend late winter and early spring.  In late winter many of the plants will be dormant and you will be better able to see the branching structure.  In spring, the plants will be actively growing and can recover quickly from pruning.  For early spring bloomers, such as azaleas, it is best to prune them immediately after they are finished with their flowers.    To get more information on pruning or any other horticulture question you may have, give me a call at the Extension office, 901-465-5233.  UT Extension offers its programs to all eligible persons regardless of race, color, national origin, sex, age, religion, disability or veteran status and is an Equal Opportunity employer.


Wednesday, August 29, 2012

4-Hers Learn to Grill

This past weekend, five Fayette County 4-Hers participated in the Outdoor Meat Cookery Contest in Jackson, TN.  They had all spent the last few weeks learning how to grill with charcoal and planning out their theme.  The grilling contest, as we like to call it, is maybe the most fun 4-H contest to participate in because all of the training sessions consist of the kids hanging out with other 4-Hers and eating what they cook.  The contest is also very competitive.  There were around 90 4-Hers there on Saturday grilling. 

Where there is smoke, there is fire!
 

We had a high school team as well as a junior high individual who competed.  Teams are made up of four kids who all must grill something different.  One grills pork, one grills chicken, another youth grills beef, and still another grills lamb.  They have to do this start to finish, on separate grills, with no help or coaching from any adult.  They each grill two pieces of meat.  One piece goes to to the judges for taste testing and the other goes on the team platter for theme judging.  Any side dishes they put on their theme table has to be grilled as well.

This year, the Fayette County 4-Hers chose Native American Cooking as their theme.  Here they are with their table and platter.

 
 Left to Right:  Victaven Murrell, Jessica Brewer, Logan Laine, Rachel Wilson, and Marah Williams


Looks delicious!!
 
Logan Laine, our Jr. High individual contestant, won third place for his delicious chicken!  We were all very proud.  If you would like for your child to learn how to safely grill with charcoal, then give me a call at the Extension office.  We teach this skill every summer and would love to have  your family take part. 

Thursday, August 2, 2012

Gardening by the Numbers


Get out your calendars and your seed packets, because it’s time to plant your fall garden!  I know, it feels way too hot outside to even think about fall, but pretty soon you will be craving those fresh mustard greens.  So, if you have space in your garden from your played-out summer veggies, consider replanting with broccoli, cauliflower, collards, lettuce, mustard, radish, spinach, or turnips. 

The fall garden isn’t without its challenges.  You will have to deal with heat, water stress, insects, and weeds while you wait for cooler temps to arrive.  To cope with these issues, you should plant your seeds at the latest possible date that you can.  That is where the calendar comes in.  Start with the average first frost date for our area.  In Bolivar, the date is October 8.  In Brownsville, the date is October 11.  Next, look on the seed packet and see how many days from planting to maturity are expected.   Add ten days to that number to account for cooler weather and shorter days in the fall.  Subtract the total number of days required for the plant to grow from the date you want it to begin maturing to find the latest planting date. Keep in mind that kale, collards, and other cool season veggies can withstand some frost, and can mature two weeks after the frost date. 

For example, collards can take 65-75 days to mature.  They can also withstand a frost.  Let’s assume that Somerville’s frost date is October 9.  Two additional weeks allowed for frost-resistant veggies puts us at Oct. 23.  Remember, we need to count backwards 75 -85 days to account for the cool fall weather we eagerly anticipate.  So, that puts our planting date for collards at August 8.  That is really soon!  So, don’t procrastinate just because it’s hot and it feels like fall is never coming.  Get out there and use up that open space!  Come October, you will be glad you did!  

Friday, July 27, 2012

Herb Gardening Can be Delicious!

Home-grown tomatoes in the summer...  You just can't buy that flavor in a store.  I enjoy a tomato and mayonnaise sandwich as much as anyone else, but I also love to pair those tomatoes with fresh basil from my garden.  If you  buy fresh herbs at the grocery store, you know how expensive that can get. So, growing your own can save money too!   


Herbs like full sun, and can be grown in containers, in landscape beds, or in the veggie garden.  Rosemary, thyme, lavender,  dill, fennel, and savory are indigenous to the Mediterranean and prefer dry, lean soil in full sun.  Basil, tarragon, parsley, and allium like more water and richer soil.  Keep in mind the different water requirements when deciding where to plant your herbs.  Also, you should know that the proper time to plant annual herbs in our area is in the spring after April 15.  One exception is cilantro.  Cilantro is a cool season herb and should be planted by seed on Valentine's Day or later.  


Some commonly grown annual herbs (that have to be re-planted each year) include: cilantro, basil, parsley, dill, and stevia.  Chives, fennel, lavender, Rosemary 'Arp', oregano, mint, sage, and thyme are perennial.  However, we had such a mild winter this year that basil reseeded itself in my garden. 


They are all nearly insect and disease free. The only problem with insects I've ever had was with parsley.  Caterpillars ate every leaf on the plant.  However, those caterpillars turn into  beautiful black swallowtail butterflies, so I am o.k. with that.  


If you are thinking about growing herbs, but you aren't sure how to use them, I recommend going to a website such as allrecipes.com.  You can type an ingredient such as "fresh basil" into the search box, and it will pull up all the recipes that contain that ingredient.  Hopefully, you will consider adding them to your garden and your plate next spring. 


Tuesday, July 3, 2012

Gardening in a Drought

Wow, has it been dry lately!  Here are some ideas to help you make it through. 

Prioritize Your Watering

If you only have a few minutes to devote to hose dragging each day, then focus on the most drought susceptible spots and let the rest go.  The must-water list includes the following:
  • The vegetable garden- Sure, they can survive with little water, but you will be sacrificing food.
  • Annuals- Ever seen floppy impatiens? 
  • Container plants- Container plants tend to dry out faster -- especially terra cotta pots.
  • Newly planted trees, shrubs, and perennials- Their root systems aren't developed enough to make it through a drought.
  • New or recently repaired lawns- You spent too much money on that sod to let it croak!

Conserve Water

There are also a few things you can do to get the most out of your watering:
  • Water in the morning to prevent loss to evaporation.
  • Decrease fertilizers.
  • Don't prune your shrubs.
  • Water deeply and less often.
  • Mulch your plants.

Plan for the Next Drought

Consider installing a rain barrel to help you conserve water for the inevitable next drought.  Did you know that up to 623 gallons of water can be collected off of a 1,000 square foot roof from a one-inch rain?  That is a LOT of water!  You could be saving some of that water to use on your plants.  There are many ready-made barrels for sale at stores, or you can make your own.  Tennessee Yards and Neighborhoods has an excellent article on rain barrels with instructions.  I have a small 35 gallon rain barrel at my house, and I love it.  It even collects condensation from the air conditioning unit, so it refills very quickly whether it rains or not.  I use it to water all my annuals, containers, and newly planted perennials. 

In the meantime, keep praying for rain!

Perennial Foxtail in Hayfields Part 3

By Jeff Via


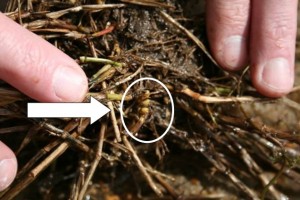
This perennial foxtail, aka knotroot foxtail, Setaria parviflora is a beast of a weed!!! More and more calls are coming in, after many folks discover they have it. We even had a producer in Georgia call the other day. Not sure if you have this type of foxtail? Well, it’s easy to identify, this perennial has fibrous roots with short, knotty rhizomes (picture below). Apparently as stated in one of the previous blogs, a species shift from the more easily controlled grass weeds, to a predominance of knotroot foxtail has occurred in many fields.


This year, many producers applied a dormant spray of paraquat or glyphosate or a combination of one of those with pendimethalin at varying rates. The fields that had the higher rates of pendimethalin showed better suppression of the seedling perennial and annual foxtail. Other fields had both perennial and seedling foxtail coming up after a glyphosate/pendimethalin treatment. Not sure the reason why the seedlings came up but this was probably due to too much rain. Rain is needed to activate the pendimethalin but not too much. One thing to note, the pendimethalin will do nothing to the perennial foxtail plants already in the field.

Since only a limited amount of research has been conducted in states south of Tennessee (where knotroot foxtail is more prevalent) with results showing that even the most effective treatments (Pastora or Pastora plus glyphosate) only providing suppression of the weed. To date, no treatments have been identified that provide complete control.

In a normal year, our recommendations would be to apply a dormant spray for winter weeds and then apply Pastora at 1.5 oz./acre + glyphosate (8 oz./ acre of a 4 lb./gal. product or equivalent) with a non-ionic surfactant at 1 qt./100 gal. 3-5 days after first cutting for knotroot foxtail suppression. This treatment could then be followed by 1 oz./acre Pastora or Pastora plus glyphosate10-14 days later if the weeds try to recover.

With the warmer than normal temperatures this year and the rapid early growth of the foxtail, troublesome fields needed to be treated prior to first cutting. We decided to treat fields with the perennial foxtail when they reached 8-10 inches in height. In many of these fields, seedlings were coming up as well.

Since only a limited amount of research had been conducted in states south of Tennessee (where knotroot foxtail is more prevalent) and the results show that even the most effective treatments (Pastora or Pastora plus glyphosate) only provide suppression of the weed. We decided to do some research in state.

 On March 28, 2012, Extension agents in Fayette and Shelby County along with help from BASF put out a research plot targeting perennial foxtail. This plot was located in a field where the perennial foxtail pressure was heavy.  The field was treated with varying rates of pendimethalin (Prowl H2O) (1.5 qts., 2qts. and 4qts.); the plot was conducted where 2 quarts of Prowl H20 was applied along with glyphosate as a dormant spray.  Go to our website to see  the treatments applied to the plot:

The remainder of the field was sprayed with Pastora at 1.5 oz. plus 8oz. of the 4lb./gal. glyphosate plus a surfactant at 1 quart/ 100 gal. After monitoring the plot/field, we rated both for injury and suppression/control to see how the different applications affected the perennial foxtail.  Ratings were conducted on April 13, 2012.  The table on our website contains the ratings.

The producer had reduced growth and discoloration of the bermudagrass following the applications but was aware of this ahead of time and knew this was part of the process to suppress the perennial foxtail. This was temporary and the bermudagrass recovered.

The field/plot was fertilized on 4/19/2012 with 80-20-40 and then cut for hay on 5/20/2012. On 5/25/2012 the producer applied Pastora at 1.0 oz. plus 8oz. of the 4lb./gal. glyphosate plus a surfactant at 1 quart/ 100 gal. to the field leaving out the plot.

On 6/12/2012, again with help from BASF, the plot received its second shots.  See the website for treatments applied to the plot:

After monitoring the plot/field, we rated both again for injury and suppression/control to see how the different applications affected the perennial foxtail.  Ratings were conducted on June 26, 2012 (Table 1 above).
The above listed treatments are experimental and not labeled for use in hayfields with the exception of Plateau. UT’s recommendation again, is a dormant spray of paraquat or glyphosate or a combination of this with pendimethalin followed by Pastora at 1.5 oz./acre + glyphosate (8 oz./ acre of a 4 lb./gal. product or equivalent) with a non-ionic surfactant at 1 qt./100 gal. 3-5 days after cutting. Then Pastora at 1.0 oz./acre + glyphosate (8 oz./ acre of a 4 lb./gal. product or equivalent) with a non-ionic surfactant at 1 qt./100 gal. 10-14 days later if the weeds try to recover. This treatment is subject to change depending on the year. This year was one we had to tweak.
After reviewing the data from the plot and the field, we were able to get roughly 85% suppression and the farmer was pleased. More research will continue the remainder of the year and again next year.

Friday, June 29, 2012

The Birds and the Bees for Vegetable Gardeners

Occasionally I have gardening friends who tell me they have blooms everywhere in their gardens, but little fruit.  Sometimes it helps to know something about how that particular plant is pollinated. 

For instance, did you know that members of the cucurbit family, which includes squash and cucumbers, have seperate male and female blossoms on the same plant?  That is why you will never have all of your squash blossoms producing fruit.  The males are unable to, of course.  Most always, the plants put on many male flowers for a couple of weeks before ever making a female flower with the potential for pollination.  Often times gardeners think that something must be wrong with their plant because they have so many blooms and no cucumbers. 

When you do get both male and female flowers on the plant at the same time, they are usually bee pollinated.  A flower usually has to be visited by a bee six or eight times before good pollination occurs.  If you aren't noticing many bees, and are concerned that pollen isn't getting transferred, you can always assist nature by using a cotton swab to move the pollen from the male flower to the female flower yourself.  It is pretty easy to tell which flowers are which.  The female flowers have a tiny immature fruit at the stem of the flower.  The male flowers don't.  Also, you can tell by looking in the center of the bloom. 

Squash blossoms are also edible!  There are tons of squash blossom recipes on the internet, and now that you know which flowers are which, you can fry up your excess male flowers without worrying that you are taking away a potential fruit!  The photos below show the inside of the female and male squash blossoms.

Female squash blossom


Male squash blossom

At my house, I have a cucumber plant that must have 50 or 60 male blossoms, but only one female.  So, I will just have to keep waiting until nature takes its course.